SharePoint 2013 – create an external content type for SQL Server
I am creating an external content type to display records from an SQL table in a SharePoint list, using a target application in the Secure Store for authentication. I will do this using SharePoint Designer 2013. At a minimum, I must configure a ‘Read Item’ and a ‘Read List’ operation before I can create the external content type. Here is how it is done:
- Start SharePoint Designer 2013, click Open Site and enter the URL for the site
- In the navigation pane, under Site Objects, click External Content Types
- On the ribbon click External Content Type
- Next to Name click New external content type and enter a name for the new external content type
- Next to Display Name enter a more descriptive name for the external content type
- Set the Office Item Type to Generic List
- Click the Click here to discover external data sources and define operations link
- Click Add Connection and change the Data Source Type to SQL Server and click OK

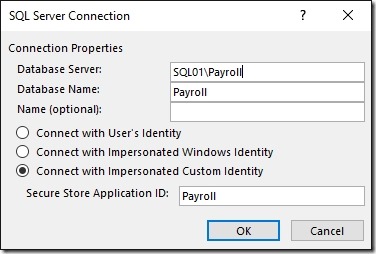
- Enter the Database Server, Database Name, choose Connect with Impersonated Custom Identity and enter the Secure Store Application ID. Click OK
 Note: If you have not created a Target Application in the Secure Store you may wish to follow this guide: Configure the Secure Store and create a Target Application
- In the Data Source Explorer pane expand the Tables node in the tree view. Right-click on the required table and select Create All Operations
- Click Next
- By default, all columns are selected to deselect those not required. For the column that is to be used as a unique identifier check the Map to Identifier box and check the Show in Picker box. Click Next
Note: always review the errors and warnings and correct any problems.
- Click Finish
- On the ribbon click Summary View
- In the list of fields select a field that has a unique value and click Set as Title in the ribbon
- In Central Administration, under Application Management, click Manage service applications
- Click on the Business Data Connectivity Service and the new external content type should be visible in the list
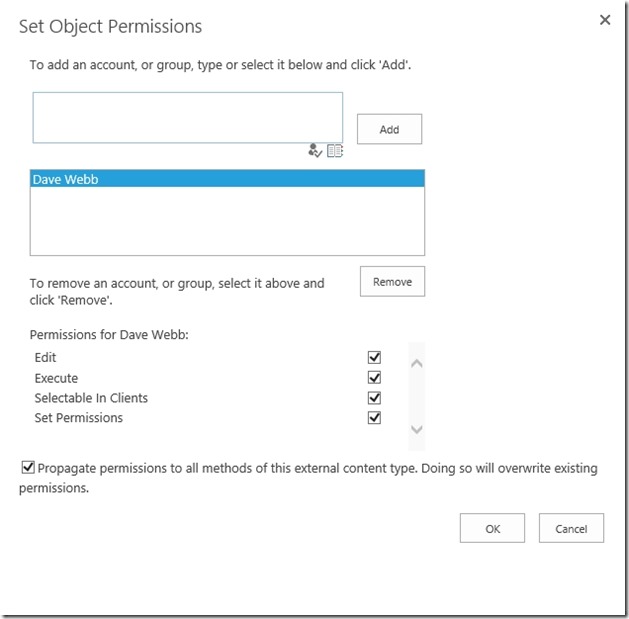
- Check the box next to the new external content type and click Set Object Permissions in the ribbon
- Add the user(s) that require access to the external content type and grant the appropriate permissions Click OK

![[BlogBookmark]](http://www.adventuresinsharepoint.co.uk/wp-content/plugins/bookmarkify/blogbookmark.png)
![[Blogsvine]](http://www.adventuresinsharepoint.co.uk/wp-content/plugins/bookmarkify/blogsvine.png)
![[del.icio.us]](http://www.adventuresinsharepoint.co.uk/wp-content/plugins/bookmarkify/delicious.png)
![[Digg]](http://www.adventuresinsharepoint.co.uk/wp-content/plugins/bookmarkify/digg.png)
![[Facebook]](http://www.adventuresinsharepoint.co.uk/wp-content/plugins/bookmarkify/facebook.png)
![[Furl]](http://www.adventuresinsharepoint.co.uk/wp-content/plugins/bookmarkify/furl.png)
![[Google]](http://www.adventuresinsharepoint.co.uk/wp-content/plugins/bookmarkify/google.png)
![[LinkedIn]](http://www.adventuresinsharepoint.co.uk/wp-content/plugins/bookmarkify/linkedin.png)
![[MySpace]](http://www.adventuresinsharepoint.co.uk/wp-content/plugins/bookmarkify/myspace.png)
![[Reddit]](http://www.adventuresinsharepoint.co.uk/wp-content/plugins/bookmarkify/reddit.png)
![[Slashdot]](http://www.adventuresinsharepoint.co.uk/wp-content/plugins/bookmarkify/slashdot.png)
![[StumbleUpon]](http://www.adventuresinsharepoint.co.uk/wp-content/plugins/bookmarkify/stumbleupon.png)
![[Twitter]](http://www.adventuresinsharepoint.co.uk/wp-content/plugins/bookmarkify/twitter.png)
![[Windows Live]](http://www.adventuresinsharepoint.co.uk/wp-content/plugins/bookmarkify/windowslive.png)
![[Yahoo!]](http://www.adventuresinsharepoint.co.uk/wp-content/plugins/bookmarkify/yahoo.png)
![[Email]](http://www.adventuresinsharepoint.co.uk/wp-content/plugins/bookmarkify/email.png)