Installing Reporting Services for SharePoint 2013 to support Power View
Today I am installing Microsoft SQL Server 2012 Reporting Services (SSRS) to enable the Power View feature in SharePoint 2013. There are three steps to this process:
- Install, register and start Reporting Services Report Server
- Create a Reporting Services Service Application
- Activate the Power View Site Collection Feature
Step 1 – Install Reporting Services Report Server in SharePoint mode
- Log on to your SharePoint Application server and run setup.exe on the SQL installation media
- Click Installation in the navigation pane and then click New SQL Server stand-alone installation or add features to an existing installation
- On the Setup Support Rules page review any warnings and click OK
- On the Product Key page enter your key and click Next
- On the License Terms page accept the lice terms and click Next
- On the Setup Support Rules page review any warnings and click Next
- On the Setup Role page choose SQL Server Feature Installation and click Next
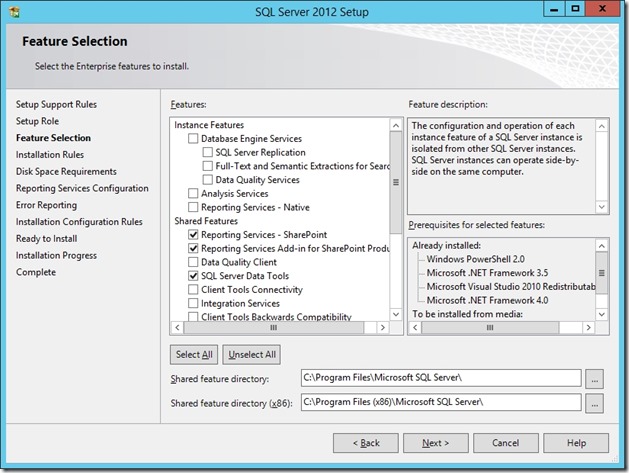
- On the Feature Selection page from the list of available shared features select the Reporting Services – SharePoint, Reporting Services Add-in for SharePoint Products and SQL Server Data Tools. Click Next

- On the Installation Rules page review any warnings and click Next
- On the Disk Space Requirements page ensure there is enough space available for the installation and click Next
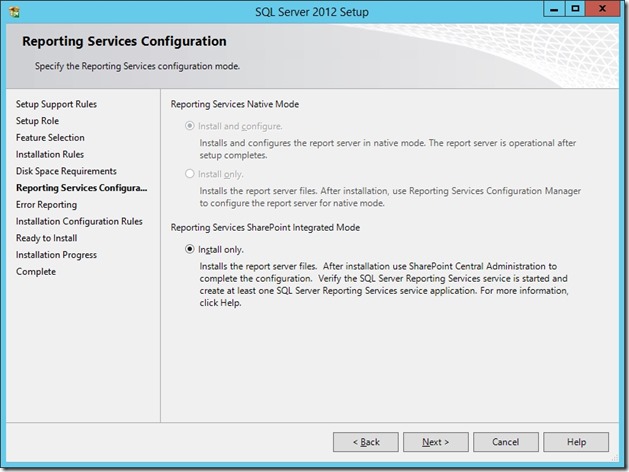
- On the Reporting Services Configuration page select Install Only and click Next

- On the Error Reporting page click Next
- On the Installation Configuration Rules page review any warnings and click Next
- On the Ready to Install page click Install
- Click Close when complete and restart the server if required
- Open a SharePoint Management Shell window
- Issue the following commands:
Install-SPRSService
Install-SPRSServiceProxy
Get-SPServiceInstance -All | Where {$_.TypeName -Like "SQL Server Reporting*"} | Start-SPServiceInstance
Step 2 – Create a Reporting Services Service Application
- Log in to Central Administration
- Under Application Management click Manage Service Applications
- From the New menu choose SQL Server Reporting Services Service Application
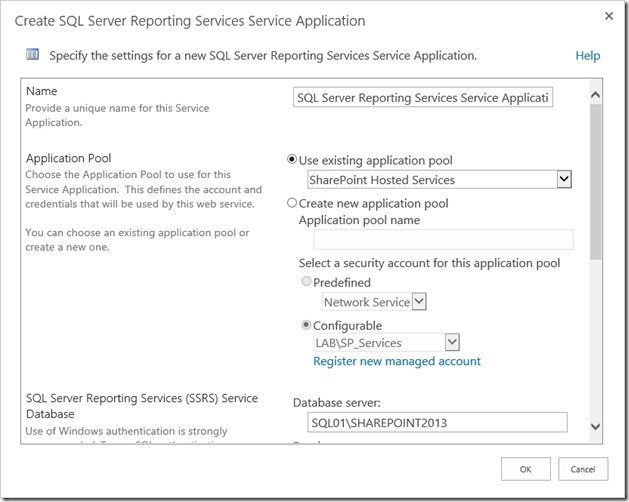
- Enter a name for the service application and configure the options to suit your environment. I have chosen to use an existing application pool. Click OK

- Click OK once the service application is created
Step 3 – Activate the Power View Site Collection Feature


![[BlogBookmark]](http://www.adventuresinsharepoint.co.uk/wp-content/plugins/bookmarkify/blogbookmark.png)
![[Blogsvine]](http://www.adventuresinsharepoint.co.uk/wp-content/plugins/bookmarkify/blogsvine.png)
![[del.icio.us]](http://www.adventuresinsharepoint.co.uk/wp-content/plugins/bookmarkify/delicious.png)
![[Digg]](http://www.adventuresinsharepoint.co.uk/wp-content/plugins/bookmarkify/digg.png)
![[Facebook]](http://www.adventuresinsharepoint.co.uk/wp-content/plugins/bookmarkify/facebook.png)
![[Furl]](http://www.adventuresinsharepoint.co.uk/wp-content/plugins/bookmarkify/furl.png)
![[Google]](http://www.adventuresinsharepoint.co.uk/wp-content/plugins/bookmarkify/google.png)
![[LinkedIn]](http://www.adventuresinsharepoint.co.uk/wp-content/plugins/bookmarkify/linkedin.png)
![[MySpace]](http://www.adventuresinsharepoint.co.uk/wp-content/plugins/bookmarkify/myspace.png)
![[Reddit]](http://www.adventuresinsharepoint.co.uk/wp-content/plugins/bookmarkify/reddit.png)
![[Slashdot]](http://www.adventuresinsharepoint.co.uk/wp-content/plugins/bookmarkify/slashdot.png)
![[StumbleUpon]](http://www.adventuresinsharepoint.co.uk/wp-content/plugins/bookmarkify/stumbleupon.png)
![[Twitter]](http://www.adventuresinsharepoint.co.uk/wp-content/plugins/bookmarkify/twitter.png)
![[Windows Live]](http://www.adventuresinsharepoint.co.uk/wp-content/plugins/bookmarkify/windowslive.png)
![[Yahoo!]](http://www.adventuresinsharepoint.co.uk/wp-content/plugins/bookmarkify/yahoo.png)
![[Email]](http://www.adventuresinsharepoint.co.uk/wp-content/plugins/bookmarkify/email.png)