Enabling SSL on a SharePoint site
With any public-facing web server these days it is best practice to use SSL to make sure traffic is encrypted. SharePoint is no exception so today I’m going to generate an SSL certificate and attach it to my site. I will then disable HTTP.
My site is for personal use and doesn’t contain any sensitive data, so I’ll the certificate authority in my Active Directory domain. For SharePoint sites used for business I’d highly recommend buying a certificate from an authority such as Thawt or Verisign.
So, the first thing I’ll do is generate a certificate request using IIS on the SharePoint server. This is the process:
- Open IIS Manager, select the server and click Server Certificates
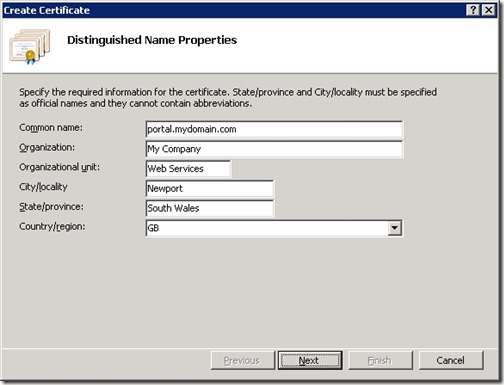
- From the Actions pane click Create Domain Certificate
- Enter all of the requested details and click Next (see the screenshot below)
- Enter the name of the certificate authority and a friendly name then click Finish
Next, I need to attach the certificate to the IIS site. Here are the steps:
- In IIS expand Sites and select the SharePoint – 80 site
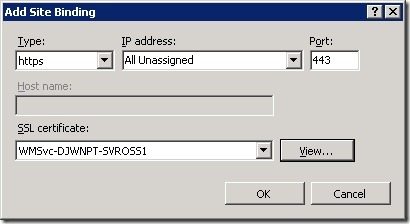
- From the Actions pane click Bindings then click Add
- Choose HTTPS from the type list and select the certificate that was created previously (see the screenshot below)
- Click OK and then click Close
The final task is to configure an alternate access mapping in SharePoint that uses HTTPS. This is how:
- Log in to the Central Administration and from the Application Management menu choose Configure alternate access mappings
- Click the URL for Internet access and modify the link to use HTTPS instead of HTTP
- Click OK
Note: You may need to make changes to your firewall configuration to allow port 443 (HTTPS) traffic to your SharePoint server.


![[BlogBookmark]](http://www.adventuresinsharepoint.co.uk/wp-content/plugins/bookmarkify/blogbookmark.png)
![[Blogsvine]](http://www.adventuresinsharepoint.co.uk/wp-content/plugins/bookmarkify/blogsvine.png)
![[del.icio.us]](http://www.adventuresinsharepoint.co.uk/wp-content/plugins/bookmarkify/delicious.png)
![[Digg]](http://www.adventuresinsharepoint.co.uk/wp-content/plugins/bookmarkify/digg.png)
![[Facebook]](http://www.adventuresinsharepoint.co.uk/wp-content/plugins/bookmarkify/facebook.png)
![[Furl]](http://www.adventuresinsharepoint.co.uk/wp-content/plugins/bookmarkify/furl.png)
![[Google]](http://www.adventuresinsharepoint.co.uk/wp-content/plugins/bookmarkify/google.png)
![[LinkedIn]](http://www.adventuresinsharepoint.co.uk/wp-content/plugins/bookmarkify/linkedin.png)
![[MySpace]](http://www.adventuresinsharepoint.co.uk/wp-content/plugins/bookmarkify/myspace.png)
![[Reddit]](http://www.adventuresinsharepoint.co.uk/wp-content/plugins/bookmarkify/reddit.png)
![[Slashdot]](http://www.adventuresinsharepoint.co.uk/wp-content/plugins/bookmarkify/slashdot.png)
![[StumbleUpon]](http://www.adventuresinsharepoint.co.uk/wp-content/plugins/bookmarkify/stumbleupon.png)
![[Twitter]](http://www.adventuresinsharepoint.co.uk/wp-content/plugins/bookmarkify/twitter.png)
![[Windows Live]](http://www.adventuresinsharepoint.co.uk/wp-content/plugins/bookmarkify/windowslive.png)
![[Yahoo!]](http://www.adventuresinsharepoint.co.uk/wp-content/plugins/bookmarkify/yahoo.png)
![[Email]](http://www.adventuresinsharepoint.co.uk/wp-content/plugins/bookmarkify/email.png)