How to create a Wiki Page Library
A SharePoint Wiki Page Library can be used for many things including departmental manuals and documenting procedures. This is mainly because it is quick and easy for groups of people to create pages and link them together.
Today I’m creating a wiki that will be used as an employee handbook. It will be available for everyone in the company to see and maintained by the HR department.
If you want to do something similar just follow these steps to get started:
1. From the Site Actions menu click More Options
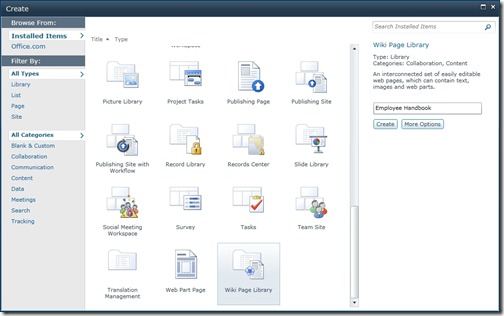
2. Choose Wiki Page Library, enter a name for the library and click Create
3. After a few moments the library is created and you should see a welcome screen
And that’s it, the new wiki page library is ready to use. Firstly I’ll modify the text on the home page to give a brief introduction to the wiki, maybe add a picture, change the layout and add some links.
Editing pages
To start editing click the Edit button on the Page tab of the ribbon.
Once in edit mode you will see familiar buttons to format text and insert items. You can also change the layout of the page to include several columns, align text differently or insert a table.
Adding links
Now that I have added some text to the home page I can start adding links to other pages. To do this I simply enclose the link text in double square brackets, like this:
[[Contract of employment]]
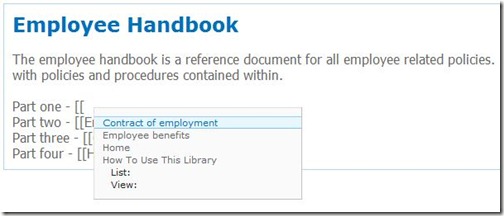
When I start typing I am presented with a list of existing pages that updates as I type – I can select one of these pages for the link, as you can see in the screenshot below:
If I want to create a link to a page that doesn’t exist then SharePoint will give me the option to create it later. In Edit mode the links I’ve created for my employee handbook look like this:
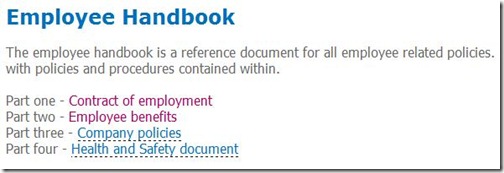
In normal mode the page looks like this:
The dotted underline means the target pages don’t exist – if I click these links I’m prompted to created the new page. Once created I’m taken straight into Edit mode for that page.
Changing the layout
I’ve decided to change the layout and split the page – this is done by choosing the Text Layout button on the ribbon and selecting one column with sidebar.
Adding pictures
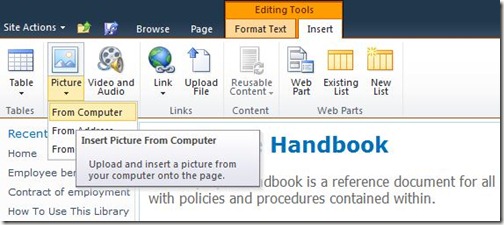
Adding a picture is easy – I just place the cursor on the page where I want to insert the picture, select the Insert tab on the ribbon and then click the Picture button – from here I can insert a picture from my computer, from a web address or directly from a SharePoint Library.
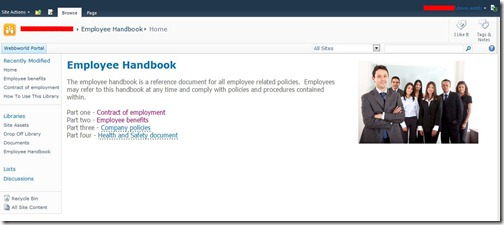
And here is how my welcome page looks:


![[BlogBookmark]](http://www.adventuresinsharepoint.co.uk/wp-content/plugins/bookmarkify/blogbookmark.png)
![[Blogsvine]](http://www.adventuresinsharepoint.co.uk/wp-content/plugins/bookmarkify/blogsvine.png)
![[del.icio.us]](http://www.adventuresinsharepoint.co.uk/wp-content/plugins/bookmarkify/delicious.png)
![[Digg]](http://www.adventuresinsharepoint.co.uk/wp-content/plugins/bookmarkify/digg.png)
![[Facebook]](http://www.adventuresinsharepoint.co.uk/wp-content/plugins/bookmarkify/facebook.png)
![[Furl]](http://www.adventuresinsharepoint.co.uk/wp-content/plugins/bookmarkify/furl.png)
![[Google]](http://www.adventuresinsharepoint.co.uk/wp-content/plugins/bookmarkify/google.png)
![[LinkedIn]](http://www.adventuresinsharepoint.co.uk/wp-content/plugins/bookmarkify/linkedin.png)
![[MySpace]](http://www.adventuresinsharepoint.co.uk/wp-content/plugins/bookmarkify/myspace.png)
![[Reddit]](http://www.adventuresinsharepoint.co.uk/wp-content/plugins/bookmarkify/reddit.png)
![[Slashdot]](http://www.adventuresinsharepoint.co.uk/wp-content/plugins/bookmarkify/slashdot.png)
![[StumbleUpon]](http://www.adventuresinsharepoint.co.uk/wp-content/plugins/bookmarkify/stumbleupon.png)
![[Twitter]](http://www.adventuresinsharepoint.co.uk/wp-content/plugins/bookmarkify/twitter.png)
![[Windows Live]](http://www.adventuresinsharepoint.co.uk/wp-content/plugins/bookmarkify/windowslive.png)
![[Yahoo!]](http://www.adventuresinsharepoint.co.uk/wp-content/plugins/bookmarkify/yahoo.png)
![[Email]](http://www.adventuresinsharepoint.co.uk/wp-content/plugins/bookmarkify/email.png)